Automation makes life so much easier. Who doesn’t want some George Jetson-style automation? As a child, this was always the coolest thing. A machine that automates your morning routine saving you time and letting you get to other things more quickly. We live in that world. Almost. Your HubSpot CRM is more than happy to create workflows to automate your business processes, save you time, and make your life easier. And maybe one day, brush your teeth.
HubSpot workflows are foundational to a positive experience with the CRM. Nothing is more annoying than being unable to find a problem workflow or reviewing your lead sourcing workflows because you can’t find them.
Workflow views
Views are a great way to filter by specific criteria in HubSpot. You can create views filtering out properties in the contact and company views. Workflows are similar. You can select criteria to filter. For example, workflows that are on or off, the creator of the workflow, or even criteria such as triggers, last update, or enrolled total.
Views allow you to group workflows with similar characteristics that may serve different functions. If you want to see all workflows that were updated on a particular day, that wouldn’t be a good group to folder together since they may be a lead routing workflow and a lead grading workflow. Great for a view but bad for foldering.
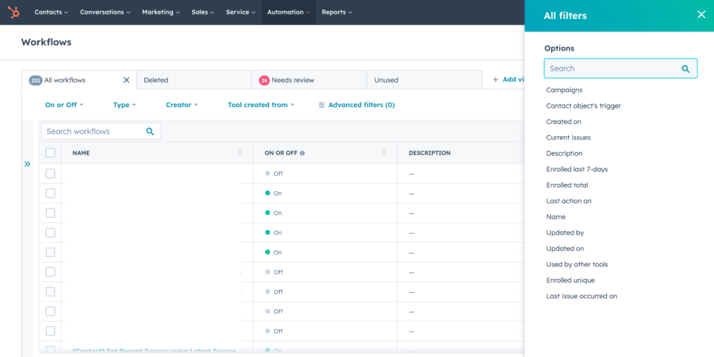
Pro Tip: Use Views when you need to see something quickly or need to display data in the table format.
Folders and subfolders
Organization in your CRM instance is vital to maintaining usability. Nothing is worse than diving into workflows and being inundated with every workflow in no particular order. In HubSpot, you can organize your workflows into folders and subfolders quickly and easily.
Before foldering, spend time developing a consistent naming convention. It may seem like a lot of work up-front, but it will provide clarity and reliability for all CRM users. Additionally, when naming conventions are clear, duplicate workflows are less likely to be created. Users can find the automation they are looking for.
To create workflow folders, go to the “Automation” tab and click “Folders” on the far right. Then “Create Folder” on the left. This will prompt you to name your new folder. After that, start filling it with all the appropriate workflows.
If you need to segment a folder further, you create a subfolder. While in the folder you want to add the subfolder to, just select “Create Folder” again, and the new folder will be nested within.
Advantages of custom folders
✔️ Streamlined Workflow Management
-
- Folders and subfolders provide a hierarchical structure to categorize and group similar workflows. This organization simplifies the workflow management process, allowing you to locate, update, and modify workflows more efficiently.
✔️ Improved Data Organization and Visibility
-
- Finding specific workflows becomes a breeze with a well-organized folder structure. Instead of scrolling through a long list of workflows, you can quickly navigate to the relevant folder or subfolder, saving time and effort.
✔️ Enhanced Collaboration
-
- Folders and subfolders promote collaboration among team members by creating a logical framework for workflow sharing. By grouping workflows based on teams, projects, or departments, you can ensure that the right people have access to the relevant workflows, fostering effective collaboration and coordination.
Best practices for usage
👉 Establish a Clear Naming Convention: Before creating folders and subfolders, establish a consistent naming convention to ensure clarity and uniformity. Consider using descriptive names that reflect the purpose, function, or project associated with the workflows contained within each folder. For example, you might have folders named "Sales Automation," "Customer Onboarding," or "Email Marketing Campaigns."
👉 Plan the Folder Hierarchy: Take the time to plan the structure of your folders and subfolders based on your organization's specific needs. Consider factors such as departments, teams, project types, or customer journey stages. Keep the hierarchy simple while ensuring it reflects your workflow management requirements.
👉 Create Folders: To create a new folder, navigate to the "Automation" tab in HubSpot and select "Workflows." Click on the "Create folder" button and provide a descriptive name for the folder. This initial step sets the foundation for organizing your workflows effectively.
👉 Establish Subfolders: To create subfolders within a folder, drag and drop an existing folder onto another folder. This action creates a hierarchical structure that allows for deeper levels of organization. For example, within a "Sales Automation" folder, you can create subfolders such as "Lead Nurturing," "Deal Follow-ups," or "Customer Retention."
👉 Regularly Review and Update: As your workflows evolve and new ones are added, it's essential to periodically review and update your folder structure. This ensures the organization remains relevant and aligned with your evolving business needs. Consider conducting regular audits to identify outdated or redundant workflows.
👉 Assign Folder Permissions: HubSpot allows you to assign permissions at the folder level, granting access to specific individuals or teams. Leverage this feature to control who can view, edit, or manage workflows within each folder. By assigning permissions strategically, you can maintain data integrity and streamline collaboration.
👉 Utilize Search and Filter Functionality: HubSpot's search and filter functionalities are invaluable when navigating many workflows. Use the search bar to locate specific workflows by name, keywords, or tags. Additionally, use filters to narrow down workflows based on criteria such as creation date, owner, or status.
Unused workflows
The automation you create may come in and out of use. You may have created a workflow for a one-time fix and turned it off or changed your lead routing and deprecated a workflow. But it is still there, waiting to confuse someone.
HubSpot makes this easy by giving you a tab for all unused workflows. The CRM will automatically move a workflow based on the following: “Unused workflows are workflows that are turned off or haven't executed any actions in the last 90 days. A workflow will not count as unused if it's referenced by a list or another workflow.”
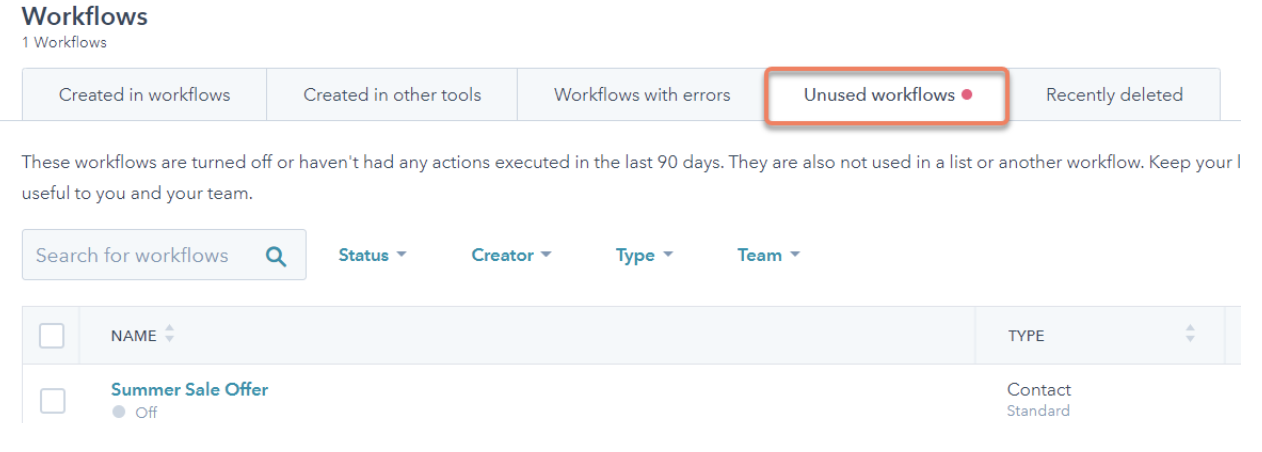
Occasionally reviewing workflows that are not used and are still on is essential. If no contacts have traveled through the workflow in a long time, but it is still on, there are potential downstream effects to leaving it running. You can also delete workflows that are genuinely unnecessary using this tab.
Pro Tip: Deleting a workflow means the workflow name will no longer appear in the active history of a contact's record. Only delete workflows that do not significantly impact the contact.
At-risk workflows
Warning lights should not be ignored. When your check engine light pops on, you want to get your car checked out soon. When your fire alarm goes off, you get out of the house. When a HubSpot workflow is at-risk… it gets ignored.
What if the issue is with lead routing workflows? Or deal flows? That can affect your bottom line. Don’t ignore this warning. Investigate it!
You will see workflows with potential issues in your “Needs Review” section of workflows. Once you click that, you can click on specific workflows with issues and review the probable error.

HubSpot provides clear documentation on the issues and alerts for you to check to begin fixing the issues. You must consider downstream effects and root causes when fixing a workflow.
An alert may be simple. For example, an email couldn’t be sent because the contacts couldn’t receive it because they bounced or were a non-marketing contact. You may think the solution is to make non-marketing contacts marketing contacts. The downstream effect is that this can push you over your Hubspot contact limit and cause your subscription price to rise.
Instead, look at how a non-marketing contact got into a workflow where an email gets sent. What are the enrollment criteria that pulled them in? Is that the proper criteria? Should this contact have gone through? Are there other contacts with similar issues? You are solving the root problem now, which means your fix won’t be a bandaid, but an actual improvement to your system.
Make life easier
Workflows will undoubtedly make your life easier. When set up and adequately maintained, workflows will provide better data and reliability. Folders and subfolders organization can help all users find the information they need efficiently, and keeping a clean, alert-free automation library means people can focus their time and attention on items that require a human touch. We may be years away from Rosey the Robot, but you can make sure your HubSpot platform optimally functions and meets your business needs.