Ever found yourself stuck in an endless game of hide-and-seek when it comes to getting a more in-depth overview of your user’s behavior and how they’re interacting with your content? You fall into one rabbit hole after the next, trying to trace your user's path. Meanwhile, the attribution data you do wind up with is often unreliable, indistinct, and useless.
This is where UTMs come in…like 007 spy gadgets (minus rocket launchers and invisible cloaks, of course!) Harnessing the power of UTMs in HubSpot unlocks a treasure trove of insights, allowing you to measure the effectiveness of your marketing activities and make data-driven decisions with confidence.
Marketing success is just a UTM away. In this post, we’ll walk you through how to pass UTM data to HubSpot via forms.

Before we dive in...what's a UTM anyway?
Skip to the next section if you already know what a UTM is and how it can be used.
UTM (Urchin Tracking Module) are parameters added to your URLS that provide detailed information about the source, medium, campaign, and other attributes of a visitor's session. Adding UTM parameters to your URL will not impact the actual page, form, or how it loads.
Here’s an example of a URL with UTM parameters:
https://example.com/product?utm_source=facebook&utm_medium=cpc&utm_campaign=summer_sale&utm_content=ad1&utm_term=sandals
In this example, the URL indicates that the traffic:
- Originated from Facebook (utm_source)
- Through a CPC campaign (utm_medium)
- Specifically for the "summer_sale" campaign (utm_campaign)
- From the first ad variation (utm_content)
- Targeted keyword "sandals" (utm_term)
Step 1: Create HubSpot properties for UTMs
The UTM data we plan to pass to HubSpot needs a place to live. In this step, we’ll be creating new Contact properties to store that data.
There are five standard UTM parameters that you can attach to your form link and that we need to create in HubSpot.
Navigate to Settings > Properties > Contact Properties and click to Create property for each of these parameters:
- UTM Source
- UTM Medium
- UTM Campaign
- UTM Term
- UTM Content
But what are we capturing in each of those parameters? Time for a quick rundown on the data each of these parameters represents. If you’re already familiar with these terms, skip to the next step.
👉 UTM Source: Represents where traffic originated; the starting point. Common sources include: Facebook, Google, Bing, Twitter, etc.
👉 UTM Medium: This tells us the type of traffic the lead originated from and is closely related to the source. If Source is Google, then Medium may be AdWords. Values for medium might include CPC (cost per click), email, social, etc.
👉 UTM Campaign: This represents the name of the campaign used to share the URL.
👉 UTM Term: This allows you to capture and track which keyword term a website visitor came from, specifically for paid search ads.
👉 UTM Content: This is useful if you have multiple links pointing to the same URL (such as a form with two CTA buttons). This code helps you track which link was clicked.
💡You may not always have a value for medium, term, and content. These can be optional
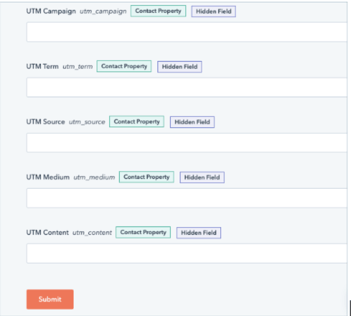
Step 2: Add the UTMs as hidden fields on your HubSpot form
Now you need to add the UTM properties as hidden fields on your Hubspot forms. They’re hidden, since these aren’t values we expect the visitor to provide when completing our form. Instead, the values will be passed via the form URL link (more about that later)!
Drag and drop each of the UTM fields onto your form. Once added, click on each field and enable “Make this field hidden” in the editing panel.
Step 3: Create tracking URLs & add to content
This is a URL with UTM parameters attached that you create in HubSpot and is attached to your campaigns. When a visitor clicks on a tracking URL to access your site, or a landing page with a form, HubSpot will save the UTM parameters in the URL to the UTM properties.
👉 Check out this HubSpot article for the steps to creating a tracking URL and adding it to your content.
💡Make sure you have the HubSpot tracking code installed on the page URL you're using.
Final Step: Test to make sure UTMs come through as expected
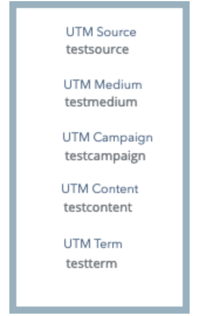
The last step is to test and make sure UTM values are mapping to HubSpot as expected. Once your form is published and has been added to a website or landing page, it’s ready for testing.
Click the URL to access the web/landing page where the form is housed. Next, you’ll manually add the following UTM parameters to the end of the URL.
www.yourwebsite.com/formpage/?utm_source=testsource&utm_medium=testmedium&utm_campaign=testcampaign&utm_content=testcontent&utm_term=testterm
Now submit your form and review the form submission in HubSpot to confirm the UTM values came through as expected.
Conclusion
Now you should be a UTM Pro. The next time you're working on a new promotion or ad campaign, channel your inner James Bond and let these sneaky little gadgets UTMs give you the edge you need to conquer the marketing world (martini not included).